{
"cells": [
{
"cell_type": "markdown",
"metadata": {
"id": "4OFmSDbTJPBk"
},
"source": [
"## $\\Large{Pandas\\; Tutorial\\; (part1)}$\n",
"\n",
"在所有資料當中,大家最熟悉的應該就是表格類型的資料了。平時我們可能習慣以Excel等試算表工具開啟表格資料並且進行操作、運算、以及製作統計圖表,然而在Python中也有一個非常好用的套件「Pandas」可以協助我們處理表格型的資料,它會將表格資料以pd.DataFrame 或是 pd.Series 兩種物件類型儲存,值得一提的是這兩個物件類型底層其實也是numpy的array型態,因此先前在Numpy所使用的函數也有許多可以直接無痛應用在pandas的物件類型上。接下來就讓我們來使用看看Pandas套件的功能吧。\n",
"\n",
"## [Panda官方手冊](https://pandas.pydata.org/pandas-docs/stable/#0)"
]
},
{
"cell_type": "markdown",
"metadata": {
"id": "2DquBzLgJPBw"
},
"source": [
"### 本章節內容大綱\n",
"* [DataFrame物件的建立、讀取、與儲存](#DataFrame物件的建立、讀取、與儲存)\n",
" - [使用list建立dataframe](#使用list建立dataframe)\n",
" - [使用dict建立dataframe](#使用dict建立dataframe)\n",
" - [將資料儲存成csv檔案](#將資料儲存成csv檔案)\n",
" - [讀取外部csv檔案為dataframe](#讀取外部csv檔案為dataframe)\n",
"* [DataFrame物件的常用屬性與方法](#DataFrame物件的常用屬性和方法)\n",
" - [觀察資料](#觀察資料)\n",
" - [欄位資料型態與描述](#欄位資料型態與描述)\n",
"* [DataFrame物件的操作](#DataFrame物件的操作)\n",
" - [使用dataframe的索引](#使用dataframe的索引)\n",
" - [挑選特定欄位之資料](#挑選特定欄位之資料)\n",
" - [篩選資料](#篩選資料)\n",
" - [對欄位進行排序](#對欄位進行排序)\n",
" - [增加與刪除欄位](#增加與刪除欄位)\n",
" - [合併多個dataframe](#合併多個dataframe)"
]
},
{
"cell_type": "markdown",
"metadata": {
"id": "0b8vxFwNJPBy"
},
"source": [
"## 載入套件"
]
},
{
"cell_type": "code",
"execution_count": null,
"metadata": {
"id": "yfKZHmaEJPBz"
},
"outputs": [],
"source": [
"import pandas as pd\n",
"\n",
"# 除了pandas之外,也從自己寫好的utils.py檔案中載入一些自定義函數幫助我們產生資料\n",
"!gdown \"https://drive.google.com/uc?export=download&confirm=no_antivirus&id=1Lu9SOxTKimEW-KNFqPqWuqQcBpWQDo78\" # upload utils.py\n",
"from utils import *"
]
},
{
"cell_type": "markdown",
"metadata": {
"id": "szBZv8iYJPB2"
},
"source": [
"\n",
"## DataFrame物件的建立、讀取、與儲存\n",
"\n",
"使用pandas建立一個表格資料並不困難,我們只需要提供資料內容以及欄位的名稱即可。最常見的是用列表(list)或是字典(dictionary)提供我們的資料給pandas。"
]
},
{
"cell_type": "markdown",
"metadata": {
"id": "mPQtgeBOJPB3"
},
"source": [
"\n",
"- ### 使用list建立dataframe"
]
},
{
"cell_type": "code",
"execution_count": null,
"metadata": {
"id": "FN5PkFCBJPB3"
},
"outputs": [],
"source": [
"# 假設我們想要建立一個包含嬰兒姓名與出生天數的表格資料,我們先以列表的方式手動輸入這些資料\n",
"names = ['Bob', 'Jessica', 'Mary', 'John', 'Mel', 'Jim']\n",
"births = [968, 155, 77, 578, 973, 968]\n",
"\n",
"# 將兩個列表內的元素一對一的合併起來,再用一個list包住它\n",
"BabyDataSet = list(zip(names, births))\n",
"\n",
"# 看一下做完的資料長怎麼樣\n",
"print(BabyDataSet)\n",
"\n",
"# 將BabyDataSet這個列表轉換成dataframe,除了提供資料之外我們也用列表的方式提供欄位的名稱\n",
"df = pd.DataFrame(data=BabyDataSet, columns=['Names', 'Births'])\n",
"df"
]
},
{
"cell_type": "markdown",
"metadata": {
"id": "BpTkNuHgJPB5"
},
"source": [
"\n",
"- ### 使用dict建立dataframe"
]
},
{
"cell_type": "code",
"execution_count": null,
"metadata": {
"id": "KF5OU7QcJPB8"
},
"outputs": [],
"source": [
"# 使用字典將資料先整理好,Key將會被當作欄位名稱,相對應的value則會被轉換成欄位的資料\n",
"BabyDataSet = {\n",
" 'names': ['Bob', 'Jessica', 'Mary', 'John', 'Mel'],\n",
" 'births': [968, 155, 77, 578, 973]\n",
"}\n",
"\n",
"# 將BabyDataSet轉換為dataframe形式,此時我們就不需要額外給予欄位名稱\n",
"df = pd.DataFrame(data=BabyDataSet)\n",
"df"
]
},
{
"cell_type": "markdown",
"metadata": {
"id": "h_ZvmJZZJPB-"
},
"source": [
"\n",
"- ### 將資料儲存成csv檔案"
]
},
{
"cell_type": "code",
"execution_count": null,
"metadata": {
"id": "9SQS7T4eJPB_"
},
"outputs": [],
"source": [
"# 使用to_csv的方法將上面的dataframe存成csv檔案,只需要提供檔案路徑即可\n",
"df.to_csv(\"birth_data.csv\")"
]
},
{
"cell_type": "markdown",
"metadata": {
"id": "-pqCQaiBJPB_"
},
"source": [
"\n",
"- ### 讀取外部csv檔案為dataframe"
]
},
{
"cell_type": "code",
"execution_count": null,
"metadata": {
"id": "OL4pSpgRJPCA"
},
"outputs": [],
"source": [
"# 將剛剛存好的csv檔案再一次讀取進python並同樣命名為df\n",
"df = pd.read_csv(\"birth_data.csv\", index_col=0)"
]
},
{
"cell_type": "code",
"execution_count": null,
"metadata": {
"id": "8a01Ddi8JPCB"
},
"outputs": [],
"source": [
"df"
]
},
{
"cell_type": "markdown",
"metadata": {
"id": "Sdw1yNIMJPCB"
},
"source": [
"雖然csv格式是在做資料科學時最常見到的檔案之一,但除了csv檔案外,Pandas也支援讀取或儲存其他各式各樣的檔案格式,若有興趣或您手上的資料並非csv檔案的話可以參考看看官方文件中關於這部分所提供的功能喔。\n",
"\n",
"- [官方文件連結](https://pandas.pydata.org/pandas-docs/stable/user_guide/io.html)"
]
},
{
"cell_type": "markdown",
"metadata": {
"id": "TN7A6J7mJPCC"
},
"source": [
"---\n",
"\n",
"## DataFrame物件的常用屬性和方法\n",
"\n",
"還是覺得Excel呈現的資訊比較豐富嗎?別擔心,pandas的DataFrame物件也提供許多方便的方法讓我們可以觀察以及了解資料,第二部分就讓我們來看一下一些最基本的方法吧。"
]
},
{
"cell_type": "markdown",
"metadata": {
"id": "jhahzfRxJPCD"
},
"source": [
"\n",
"- ### 觀察資料\n",
"\n",
"當我們手上拿到資料後,首先當然是需要看表格內到底有甚麼欄位、以及資料大概的樣子。但如果資料很大的話要呈現所有資料不僅費時又很容易眼花撩亂,因此通常我們會只看前幾筆資料或是隨機看幾筆資料,在Pandas中我們可以輕易的使用.head()、.tail()、以及.sample()等方式只抽出幾筆資料做觀察。"
]
},
{
"cell_type": "code",
"execution_count": null,
"metadata": {
"id": "mO2HfigQJPCD"
},
"outputs": [],
"source": [
"# 產生範例的資料集\n",
"dataset = CreateDataSet(4)\n",
"df = pd.DataFrame(data=dataset, columns=['State', 'Status', 'CustomerCount', 'StatusDate'])"
]
},
{
"cell_type": "code",
"execution_count": null,
"metadata": {
"id": "aqbB6adTJPCE"
},
"outputs": [],
"source": [
"# 使用.head(n=10)的方法觀察前10筆資料,若不輸入n則預設呈現前五筆資料\n",
"df.head(n=10)"
]
},
{
"cell_type": "markdown",
"metadata": {
"id": "N99fJoRkJPCE"
},
"source": [
"可以看到資料內總共有4個欄位,分別為State、Status、CustomerCount、StatusDate,不同的欄位似乎有不同的資料類型(數字、文字、日期)。\n",
"\n",
"另外最前面沒有欄位名稱的部分在Pandas被稱為index(索引),在沒有指定索引的狀況下會自動由0開始作編號,由於我們呈現的是前10筆資料,因此索引值為0到9。然而除了用數字之外列索引也可以是字串甚至是時間類型的格式。"
]
},
{
"cell_type": "code",
"execution_count": null,
"metadata": {
"id": "6YK12WFAJPCF"
},
"outputs": [],
"source": [
"# 使用.sample(n=6)的方法隨機抽出6筆資料\n",
"# 可以看到是隨機抽出的資料,因此索引的順序是亂的\n",
"df.sample(n=6)"
]
},
{
"cell_type": "markdown",
"metadata": {
"id": "-TqiAHvdJPCF"
},
"source": [
"\n",
"- ### 欄位資料型態與描述\n",
"\n",
"除了直接觀察資料之外,也可以用一些簡單的方法取得資料筆數、欄位名稱、欄位描述等資訊。"
]
},
{
"cell_type": "code",
"execution_count": null,
"metadata": {
"id": "J7rpZ4lfJPCG"
},
"outputs": [],
"source": [
"# 透過.shape屬性得到資料筆數與欄位數量,大家應該可以發現到這與numpy的使用方式非常類似\n",
"# 可以發現這份資料包含836筆觀察值與4個欄位\n",
"shape = df.shape\n",
"print(shape, end='\\n\\n')\n",
"\n",
"\n",
"# .columns屬性可以回傳表格資料內的欄位名稱\n",
"# 這份資料的欄位名稱分別為State、Status、CustomerCount、StatusDate\n",
"columns = df.columns\n",
"print(columns, end='\\n\\n')\n",
"\n",
"\n",
"# .index屬性可以回傳表格資料內的列索引\n",
"# 在這份資料中的列索引是從0到835的數值索引\n",
"index_ = df.index\n",
"print(index_, end='\\n\\n')\n",
"\n",
"\n",
"# .dtypes屬性顯示的是各個欄位的資料型態\n",
"dtypes = df.dtypes\n",
"print(dtypes, end='\\n\\n')\n",
"\n",
"\n",
"# 利用.info()方法可以知道表格資料各欄位的數量、資料型態、以及記憶體使用量\n",
"info = df.info()\n",
"print(info, end='\\n\\n')"
]
},
{
"cell_type": "markdown",
"metadata": {
"id": "t-AcEPSBJPCG"
},
"source": [
"在這份資料中,共有一個時間型態的欄位、兩個整數類型的欄位、以及一個物件類型的欄位。然而不同資料型態之間又有甚麼差異呢?讓我們用以下的表格來幫大家整理吧。\n",
"\n",
" "
]
},
{
"cell_type": "markdown",
"metadata": {
"id": "d5HTkMJmJPCH"
},
"source": [
"---\n",
"\n",
"## DataFrame物件的操作\n",
"\n",
"大家最常使用excel的功能是甚麼呢? 在這個部分我們將會教大家一些好用的函數跟方法讓大家可以快速地在python上也可以操作表格資料唷。"
]
},
{
"cell_type": "markdown",
"metadata": {
"id": "0LWWnT7gJPCH"
},
"source": [
"\n",
"- ### 使用dataframe的索引\n",
"\n",
"在numpy套件裡面我們已經看過索引的用法,同樣地在pandas套件中我們也可以用類似的方法取出部分資料或元素。(將pandas的dataframe想像成二維陣列即可)\n",
"\n",
"\n",
"比較需要注意的是,在pandas中有兩種索引方式,分別為.iloc與.loc兩種方法,若不注意的話可能會取到錯誤的元素。讓我們使用下面的範例來了解這兩種方法的使用差異吧。"
]
},
{
"cell_type": "markdown",
"metadata": {
"id": "ioSZDyg-JPCH"
},
"source": [
"#### .iloc 的使用
"
]
},
{
"cell_type": "markdown",
"metadata": {
"id": "d5HTkMJmJPCH"
},
"source": [
"---\n",
"\n",
"## DataFrame物件的操作\n",
"\n",
"大家最常使用excel的功能是甚麼呢? 在這個部分我們將會教大家一些好用的函數跟方法讓大家可以快速地在python上也可以操作表格資料唷。"
]
},
{
"cell_type": "markdown",
"metadata": {
"id": "0LWWnT7gJPCH"
},
"source": [
"\n",
"- ### 使用dataframe的索引\n",
"\n",
"在numpy套件裡面我們已經看過索引的用法,同樣地在pandas套件中我們也可以用類似的方法取出部分資料或元素。(將pandas的dataframe想像成二維陣列即可)\n",
"\n",
"\n",
"比較需要注意的是,在pandas中有兩種索引方式,分別為.iloc與.loc兩種方法,若不注意的話可能會取到錯誤的元素。讓我們使用下面的範例來了解這兩種方法的使用差異吧。"
]
},
{
"cell_type": "markdown",
"metadata": {
"id": "ioSZDyg-JPCH"
},
"source": [
"#### .iloc 的使用  \n",
"在pandas中,iloc的使用方式與numpy的索引方式相同,比較容易搞錯的地方是由於它後面接的是中括號而不是小括號"
]
},
{
"cell_type": "code",
"execution_count": null,
"metadata": {
"id": "ci_0I6BrJPCI"
},
"outputs": [],
"source": [
"# 挑選df中第一列第一欄的資料\n",
"df.iloc[0, 0]"
]
},
{
"cell_type": "code",
"execution_count": null,
"metadata": {
"id": "Lylau1B8JPCI"
},
"outputs": [],
"source": [
"# 挑選df中第一欄的所有資料\n",
"df.iloc[:, 0]"
]
},
{
"cell_type": "code",
"execution_count": null,
"metadata": {
"id": "pjuGxRbmJPCI"
},
"outputs": [],
"source": [
"# 挑選df中第一列的所有資料\n",
"df.iloc[0]"
]
},
{
"cell_type": "markdown",
"metadata": {
"id": "KJ9YCOyCJPCJ"
},
"source": [
"#### .loc 的使用
\n",
"在pandas中,iloc的使用方式與numpy的索引方式相同,比較容易搞錯的地方是由於它後面接的是中括號而不是小括號"
]
},
{
"cell_type": "code",
"execution_count": null,
"metadata": {
"id": "ci_0I6BrJPCI"
},
"outputs": [],
"source": [
"# 挑選df中第一列第一欄的資料\n",
"df.iloc[0, 0]"
]
},
{
"cell_type": "code",
"execution_count": null,
"metadata": {
"id": "Lylau1B8JPCI"
},
"outputs": [],
"source": [
"# 挑選df中第一欄的所有資料\n",
"df.iloc[:, 0]"
]
},
{
"cell_type": "code",
"execution_count": null,
"metadata": {
"id": "pjuGxRbmJPCI"
},
"outputs": [],
"source": [
"# 挑選df中第一列的所有資料\n",
"df.iloc[0]"
]
},
{
"cell_type": "markdown",
"metadata": {
"id": "KJ9YCOyCJPCJ"
},
"source": [
"#### .loc 的使用  \n",
".loc與 .iloc 的差異在於.iloc接受的是數值索引,而.loc的方法則接受的是列的索引與欄位名稱。同樣地,使用.loc時後方要加的是中括號而非小括號。"
]
},
{
"cell_type": "code",
"execution_count": null,
"metadata": {
"id": "adlbC3SvJPCJ"
},
"outputs": [],
"source": [
"# 挑選index為0且欄位為State的資料\n",
"df.loc[0, 'State']"
]
},
{
"cell_type": "code",
"execution_count": null,
"metadata": {
"id": "Z1oQlqdGJPCK"
},
"outputs": [],
"source": [
"# 挑選index為0的所有欄位資料\n",
"df.loc[0, :]"
]
},
{
"cell_type": "code",
"execution_count": null,
"metadata": {
"id": "SwMU8JKAJPCL"
},
"outputs": [],
"source": [
"# 挑選index為0的所有欄位資料,與上面的程式碼結果相同\n",
"df.loc[0]"
]
},
{
"cell_type": "code",
"execution_count": null,
"metadata": {
"id": "0rQbiHRaJPCL"
},
"outputs": [],
"source": [
"# 挑選index為1或5且從State 到CustomerCount 的資料\n",
"df.loc[[1, 5], 'State':'CustomerCount']"
]
},
{
"cell_type": "markdown",
"metadata": {
"id": "pd5ApJ_QJPCM"
},
"source": [
"\n",
"- ### 挑選特定欄位之資料\n",
"\n",
"在Pandas內還有最後一種使用中括號的方式,功能是取得資料中的特定欄位資料。以下我們試著使用看看。"
]
},
{
"cell_type": "code",
"execution_count": null,
"metadata": {
"id": "XQic5BDKJPCN"
},
"outputs": [],
"source": [
"# 挑選State欄位的資料,將會回傳Series類型的物件\n",
"df['State']"
]
},
{
"cell_type": "code",
"execution_count": null,
"metadata": {
"id": "461w80yTJPCN"
},
"outputs": [],
"source": [
"# 此種方式亦同樣可以挑選State欄位資料,並以Series類型回傳\n",
"df.State"
]
},
{
"cell_type": "code",
"execution_count": null,
"metadata": {
"id": "iI9u_67So5Yg"
},
"outputs": [],
"source": [
"df.State.shape"
]
},
{
"cell_type": "code",
"execution_count": null,
"metadata": {
"id": "6wcOpHt5JPCN"
},
"outputs": [],
"source": [
"# 挑選State欄位的資料,但會回傳DataFrame類型的物件\n",
"df[['State']]"
]
},
{
"cell_type": "code",
"execution_count": null,
"metadata": {
"id": "_m7OlMDbJPCO"
},
"outputs": [],
"source": [
"df[['State']].shape"
]
},
{
"cell_type": "code",
"execution_count": null,
"metadata": {
"id": "aKLPX8WbJPCO"
},
"outputs": [],
"source": [
"# 挑選State與 StatusDate兩欄位的資料\n",
"df[['State', 'Status']]"
]
},
{
"cell_type": "code",
"execution_count": null,
"metadata": {
"id": "2zbtT7WlJPCP"
},
"outputs": [],
"source": [
"df[['State', 'Status']].shape"
]
},
{
"cell_type": "markdown",
"metadata": {
"id": "D-9ZF9pgJPCP"
},
"source": [
"有沒有一種被上面的各種用法搞糊塗了呢,沒關係,在這邊我們幫大家整理一下這幾種用法的差異\n",
"\n",
"
\n",
".loc與 .iloc 的差異在於.iloc接受的是數值索引,而.loc的方法則接受的是列的索引與欄位名稱。同樣地,使用.loc時後方要加的是中括號而非小括號。"
]
},
{
"cell_type": "code",
"execution_count": null,
"metadata": {
"id": "adlbC3SvJPCJ"
},
"outputs": [],
"source": [
"# 挑選index為0且欄位為State的資料\n",
"df.loc[0, 'State']"
]
},
{
"cell_type": "code",
"execution_count": null,
"metadata": {
"id": "Z1oQlqdGJPCK"
},
"outputs": [],
"source": [
"# 挑選index為0的所有欄位資料\n",
"df.loc[0, :]"
]
},
{
"cell_type": "code",
"execution_count": null,
"metadata": {
"id": "SwMU8JKAJPCL"
},
"outputs": [],
"source": [
"# 挑選index為0的所有欄位資料,與上面的程式碼結果相同\n",
"df.loc[0]"
]
},
{
"cell_type": "code",
"execution_count": null,
"metadata": {
"id": "0rQbiHRaJPCL"
},
"outputs": [],
"source": [
"# 挑選index為1或5且從State 到CustomerCount 的資料\n",
"df.loc[[1, 5], 'State':'CustomerCount']"
]
},
{
"cell_type": "markdown",
"metadata": {
"id": "pd5ApJ_QJPCM"
},
"source": [
"\n",
"- ### 挑選特定欄位之資料\n",
"\n",
"在Pandas內還有最後一種使用中括號的方式,功能是取得資料中的特定欄位資料。以下我們試著使用看看。"
]
},
{
"cell_type": "code",
"execution_count": null,
"metadata": {
"id": "XQic5BDKJPCN"
},
"outputs": [],
"source": [
"# 挑選State欄位的資料,將會回傳Series類型的物件\n",
"df['State']"
]
},
{
"cell_type": "code",
"execution_count": null,
"metadata": {
"id": "461w80yTJPCN"
},
"outputs": [],
"source": [
"# 此種方式亦同樣可以挑選State欄位資料,並以Series類型回傳\n",
"df.State"
]
},
{
"cell_type": "code",
"execution_count": null,
"metadata": {
"id": "iI9u_67So5Yg"
},
"outputs": [],
"source": [
"df.State.shape"
]
},
{
"cell_type": "code",
"execution_count": null,
"metadata": {
"id": "6wcOpHt5JPCN"
},
"outputs": [],
"source": [
"# 挑選State欄位的資料,但會回傳DataFrame類型的物件\n",
"df[['State']]"
]
},
{
"cell_type": "code",
"execution_count": null,
"metadata": {
"id": "_m7OlMDbJPCO"
},
"outputs": [],
"source": [
"df[['State']].shape"
]
},
{
"cell_type": "code",
"execution_count": null,
"metadata": {
"id": "aKLPX8WbJPCO"
},
"outputs": [],
"source": [
"# 挑選State與 StatusDate兩欄位的資料\n",
"df[['State', 'Status']]"
]
},
{
"cell_type": "code",
"execution_count": null,
"metadata": {
"id": "2zbtT7WlJPCP"
},
"outputs": [],
"source": [
"df[['State', 'Status']].shape"
]
},
{
"cell_type": "markdown",
"metadata": {
"id": "D-9ZF9pgJPCP"
},
"source": [
"有沒有一種被上面的各種用法搞糊塗了呢,沒關係,在這邊我們幫大家整理一下這幾種用法的差異\n",
"\n",
" "
]
},
{
"cell_type": "markdown",
"metadata": {
"id": "vVCnP37bJPCP"
},
"source": [
"\n",
"- ### 篩選資料\n",
"\n",
"雖然上述的方法可以快速地幫我們挑選資料,但更多時候我們想要篩選的是符合特定規則的資料,例如在成績紀錄內只篩選出期中考不及格的同學們。遇到這種狀況的時候我們可以使用和numpy很類似的用法。"
]
},
{
"cell_type": "code",
"execution_count": null,
"metadata": {
"id": "NVcvng9vJPCP"
},
"outputs": [],
"source": [
"# 設定篩選的條件,在此判斷是否State欄位的數值為FL\n",
"condition = (df.State == 'FL')\n",
"\n",
"# 印出篩選條件看看,會發現這是一連串布林值\n",
"print(condition.head())"
]
},
{
"cell_type": "code",
"execution_count": null,
"metadata": {
"id": "1vx7v4EiJPCQ"
},
"outputs": [],
"source": [
"# 將condition放入loc中篩選判斷值為True的資料,且只呈現前十筆\n",
"df.loc[condition].head(n=10)"
]
},
{
"cell_type": "code",
"execution_count": null,
"metadata": {
"id": "MglP024xJPCQ"
},
"outputs": [],
"source": [
"df.loc[(df.State == 'FL') & (df['Status'] == 3)].head(n=10)"
]
},
{
"cell_type": "code",
"execution_count": null,
"metadata": {
"id": "nZwj03U1JPCQ"
},
"outputs": [],
"source": [
"df.loc[df.Status.isin([1, 2])].head(n=10)"
]
},
{
"cell_type": "code",
"execution_count": null,
"metadata": {
"id": "B-vbb0UjJPCR"
},
"outputs": [],
"source": [
"# 設定篩選的條件,在此判斷是否State欄位的數值為FL\n",
"condition = (df.State == 'FL')\n",
"\n",
"# 印出篩選條件看看,會發現這是一連串布林值\n",
"print(condition.head())\n",
"\n",
"# 將condition放入loc中篩選判斷值為True的資料,且只呈現前十筆\n",
"df.loc[condition].head(n=10)\n",
"\n",
"# 我們也可以做比較複雜的條件判斷並一次將篩選條件寫在內\n",
"# 同時挑選State為FL且Status為3的資料,並只呈現前十筆\n",
"df.loc[(df.State == 'FL') & (df['Status'] == 3)].head(n=10)\n",
"\n",
"# 如果需要在某個欄位內挑選符合多個可能性的數值,可以使用.isin()這個方法\n",
"# 挑選Status為1或2的資料,並只呈現前十筆\n",
"df.loc[df.Status.isin([1, 2])].head(n=10)"
]
},
{
"cell_type": "markdown",
"metadata": {
"id": "w9Z0mpXHJPCR"
},
"source": [
"\n",
"- ### 對欄位進行排序\n",
"\n",
"在Excel中大家最常用到的功能之一就是排序了,在pandas中我們也可以輕易地做到這件事情。"
]
},
{
"cell_type": "code",
"execution_count": null,
"metadata": {
"id": "0mGGQN5dJPCR"
},
"outputs": [],
"source": [
"df.sort_values(by='CustomerCount').head(10)"
]
},
{
"cell_type": "code",
"execution_count": null,
"metadata": {
"id": "I4KPt2osJPCR"
},
"outputs": [],
"source": [
"df.sort_values('Status', ascending=False)"
]
},
{
"cell_type": "code",
"execution_count": null,
"metadata": {
"id": "OcqjmNkCJPCS"
},
"outputs": [],
"source": [
"df.sort_values(by=['State', 'CustomerCount']).head(10)"
]
},
{
"cell_type": "code",
"execution_count": null,
"metadata": {
"id": "3Pdax-yJJPCS"
},
"outputs": [],
"source": [
"# 以CustomerCount欄位的數值做排序,並呈現前10筆資料。預設會由小到大做排序\n",
"df.sort_values(by='CustomerCount').head(10)\n",
"\n",
"# 依照Status欄位並且以降冪方式排序\n",
"df.sort_values('Status', ascending=False)\n",
"\n",
"# 依照State與CustomerCount排序,並呈現前10筆資料\n",
"df.sort_values(by=['State', 'CustomerCount']).head(10)"
]
},
{
"cell_type": "markdown",
"metadata": {
"id": "sCUsENvGJPCS"
},
"source": [
"\n",
"- ### 增加與刪除欄位\n",
"\n",
"我們可以使用下面的方法在一個dataframe中增加或減少欄位。"
]
},
{
"cell_type": "code",
"execution_count": null,
"metadata": {
"id": "wy5576BAJPCT"
},
"outputs": [],
"source": [
"df = pd.DataFrame(data={'name': ['Abby', 'Bob', 'Chris']})\n",
"df"
]
},
{
"cell_type": "code",
"execution_count": null,
"metadata": {
"id": "ryt6-JFyJPCT"
},
"outputs": [],
"source": [
"# 建立一個dataframe,裡面只有name這個欄位\n",
"df = pd.DataFrame(data={'name': ['Abby', 'Bob', 'Chris']})\n",
"\n",
"# 多建一個Age欄位並填入資料\n",
"df['Age'] = [20, 15, 28]\n",
"\n",
"# 在建立一個欄位greater_than_18判斷是否年齡大於18歲\n",
"df['greater_than_18'] = df['Age'] > 18\n",
"\n",
"# 將df印出看看結果是甚麼\n",
"df"
]
},
{
"cell_type": "code",
"execution_count": null,
"metadata": {
"id": "veKx6JB2JPCU"
},
"outputs": [],
"source": [
"df.drop(columns='greater_than_18')"
]
},
{
"cell_type": "code",
"execution_count": null,
"metadata": {
"id": "f9FHhrN5JPCU"
},
"outputs": [],
"source": [
"print(df.columns)"
]
},
{
"cell_type": "code",
"execution_count": null,
"metadata": {
"id": "uRzkDuy-JPCU"
},
"outputs": [],
"source": [
"# 刪除df中的greater_than_18欄位,將會回傳刪掉此欄位的dataframe出來\n",
"df.drop(columns='greater_than_18')\n",
"\n",
"# 若沒有把上面的結果存下來,df這個dataframe仍然會有兩個欄位\n",
"print(df.columns)\n",
"\n",
"# 如果我們想要在刪除欄位後不回傳任何東西,而是直接將結果存入原本的變數中,可以使用inplace這個參數\n",
"df.drop(columns='greater_than_18', inplace=True)\n",
"\n",
"# 看看設定inplace=True後資料是不是就少了這個欄位了\n",
"print(df.columns)"
]
},
{
"cell_type": "markdown",
"metadata": {
"id": "Yi8ejolwJPCU"
},
"source": [
"\n",
"- ### 合併多個dataframe\n",
"\n",
"如同在numpy上所遇到的事情,有時我們會需要以各種方式合併兩個或多個表格資料,針對這樣的需求Pandas提也供了各式各樣的函數,但以下我們只先針對concat與merge兩種不同的合併方式做說明。若大家對此部分的功能有興趣的話可以參考[Pandas官方文件](https://pandas.pydata.org/pandas-docs/stable/user_guide/merging.html)"
]
},
{
"cell_type": "markdown",
"metadata": {
"id": "dh9sDq0PJPCV"
},
"source": [
"- #### concat 功能\n",
"\n",
"pd.concat函數可以把表格資料依照行或列的方式合併起來,且擁有許多參數可供彈性地調整。"
]
},
{
"cell_type": "code",
"execution_count": null,
"metadata": {
"id": "VaSyNmuVJPCV"
},
"outputs": [],
"source": [
"# 產生範例資料,其中df1與df2的欄位名稱皆相同\n",
"\n",
"df1 = pd.DataFrame({'A': ['A0', 'A1', 'A2', 'A3'],\n",
" 'B': ['B0', 'B1', 'B2', 'B3'],\n",
" 'C': ['C0', 'C1', 'C2', 'C3'],\n",
" 'D': ['D0', 'D1', 'D2', 'D3']}, index=[0, 1, 2, 3])\n",
"\n",
"\n",
"df2 = pd.DataFrame({'A': ['A4', 'A5', 'A6', 'A7'],\n",
" 'B': ['B4', 'B5', 'B6', 'B7'],\n",
" 'C': ['C4', 'C5', 'C6', 'C7'],\n",
" 'D': ['D4', 'D5', 'D6', 'D7']}, index=[4, 5, 6, 7])"
]
},
{
"cell_type": "code",
"execution_count": null,
"metadata": {
"id": "iUAVYmXrJPCV"
},
"outputs": [],
"source": [
"# 觀察df1資料\n",
"df1"
]
},
{
"cell_type": "code",
"execution_count": null,
"metadata": {
"id": "71LmsnitJPCV"
},
"outputs": [],
"source": [
"# 觀察df2資料\n",
"df2"
]
},
{
"cell_type": "code",
"execution_count": null,
"metadata": {
"id": "vnN6s2iJJPCW"
},
"outputs": [],
"source": [
"# 沿著列的方向將兩份資料合併,相同名稱的欄位將會被視為同一個欄位\n",
"result = pd.concat([df1, df2])\n",
"result"
]
},
{
"cell_type": "code",
"execution_count": null,
"metadata": {
"id": "RaqsWmNMJPCW"
},
"outputs": [],
"source": [
"# 沿著列的方向將兩份資料合併,並且以keys函數新增index索引\n",
"result = pd.concat([df1, df2], keys=['dataframe1', 'dataframe2'])\n",
"result"
]
},
{
"cell_type": "code",
"execution_count": null,
"metadata": {
"id": "eBUG5AMFJPCW"
},
"outputs": [],
"source": [
"# 沿著欄的方向將兩份資料合併,相同的index相會被視為同一筆資料\n",
"# 在此由於df1與df2的index數值皆不相同,因此合併後的資料會有八筆\n",
"result = pd.concat([df1, df2], axis=1)\n",
"result"
]
},
{
"cell_type": "markdown",
"metadata": {
"id": "AFGRuQ3TJPCW"
},
"source": [
"#### merge功能\n",
"\n",
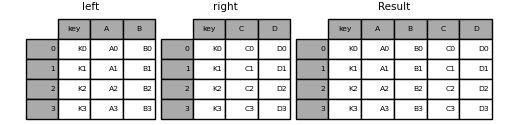
"merge不同於concat,將會對應兩資料表中指定欄位的數值將資料作合併。例如我們分別有兩份資料表紀錄產品的價格、以及產品的製造地,我們就可以依照產品名稱這個欄位將兩份資料表合併再一起,也就可以得到製造地與價格之間的對應。此種用法與資料庫語言(SQL)的JOIN方法相同。"
]
},
{
"cell_type": "code",
"execution_count": null,
"metadata": {
"id": "Eq6PhJ8dJPCX"
},
"outputs": [],
"source": [
"# 建立要合併的兩份資料,兩份資料在Key欄位內的數值相同,但其他欄位不同\n",
"\n",
"left = pd.DataFrame({'key': ['K0', 'K1', 'K2', 'K3'],\n",
" 'A': ['A0', 'A1', 'A2', 'A3'],\n",
" 'B': ['B0', 'B1', 'B2', 'B3']})\n",
"\n",
"right = pd.DataFrame({'key': ['K0', 'K1', 'K2', 'K3'],\n",
" 'C': ['C0', 'C1', 'C2', 'C3'],\n",
" 'D': ['D0', 'D1', 'D2', 'D3']})"
]
},
{
"cell_type": "code",
"execution_count": null,
"metadata": {
"id": "V4q-LqKQo5Yo"
},
"outputs": [],
"source": [
"left"
]
},
{
"cell_type": "code",
"execution_count": null,
"metadata": {
"id": "vpiQCwQEo5Yp"
},
"outputs": [],
"source": [
"right"
]
},
{
"cell_type": "code",
"execution_count": null,
"metadata": {
"id": "pON_k7H7JPCX"
},
"outputs": [],
"source": [
"# 使用pd.merge將left與right依照key欄位的數值合併起來\n",
"result = pd.merge(left, right, on='key')\n",
"result"
]
},
{
"cell_type": "markdown",
"metadata": {
"id": "Bnrk88o2JPCX"
},
"source": [
""
]
},
{
"cell_type": "markdown",
"metadata": {
"id": "s9u4K4HzJPCX"
},
"source": [
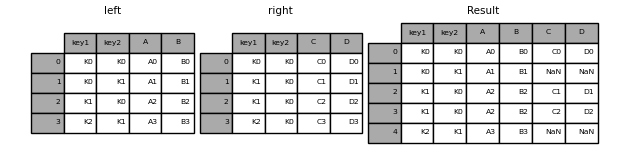
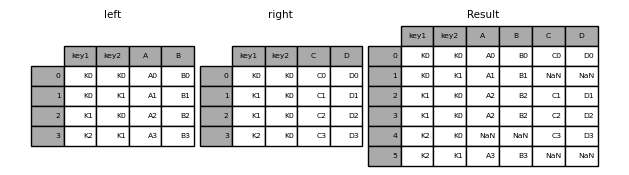
"在上面的例子中,兩份dataframe在key欄位的數值皆相同,因此在合併上並不會有特別的問題,然而有時兩份dataframe在要合併的欄位上不會完全相同,此時資料表中不重複的部分有哪些處理方式呢?在這邊我們就來介紹幾種可能的合併方法,在pd.merge函數內可以使用how參數決定使用何種合併方法。\n",
"\n",
"
"
]
},
{
"cell_type": "markdown",
"metadata": {
"id": "vVCnP37bJPCP"
},
"source": [
"\n",
"- ### 篩選資料\n",
"\n",
"雖然上述的方法可以快速地幫我們挑選資料,但更多時候我們想要篩選的是符合特定規則的資料,例如在成績紀錄內只篩選出期中考不及格的同學們。遇到這種狀況的時候我們可以使用和numpy很類似的用法。"
]
},
{
"cell_type": "code",
"execution_count": null,
"metadata": {
"id": "NVcvng9vJPCP"
},
"outputs": [],
"source": [
"# 設定篩選的條件,在此判斷是否State欄位的數值為FL\n",
"condition = (df.State == 'FL')\n",
"\n",
"# 印出篩選條件看看,會發現這是一連串布林值\n",
"print(condition.head())"
]
},
{
"cell_type": "code",
"execution_count": null,
"metadata": {
"id": "1vx7v4EiJPCQ"
},
"outputs": [],
"source": [
"# 將condition放入loc中篩選判斷值為True的資料,且只呈現前十筆\n",
"df.loc[condition].head(n=10)"
]
},
{
"cell_type": "code",
"execution_count": null,
"metadata": {
"id": "MglP024xJPCQ"
},
"outputs": [],
"source": [
"df.loc[(df.State == 'FL') & (df['Status'] == 3)].head(n=10)"
]
},
{
"cell_type": "code",
"execution_count": null,
"metadata": {
"id": "nZwj03U1JPCQ"
},
"outputs": [],
"source": [
"df.loc[df.Status.isin([1, 2])].head(n=10)"
]
},
{
"cell_type": "code",
"execution_count": null,
"metadata": {
"id": "B-vbb0UjJPCR"
},
"outputs": [],
"source": [
"# 設定篩選的條件,在此判斷是否State欄位的數值為FL\n",
"condition = (df.State == 'FL')\n",
"\n",
"# 印出篩選條件看看,會發現這是一連串布林值\n",
"print(condition.head())\n",
"\n",
"# 將condition放入loc中篩選判斷值為True的資料,且只呈現前十筆\n",
"df.loc[condition].head(n=10)\n",
"\n",
"# 我們也可以做比較複雜的條件判斷並一次將篩選條件寫在內\n",
"# 同時挑選State為FL且Status為3的資料,並只呈現前十筆\n",
"df.loc[(df.State == 'FL') & (df['Status'] == 3)].head(n=10)\n",
"\n",
"# 如果需要在某個欄位內挑選符合多個可能性的數值,可以使用.isin()這個方法\n",
"# 挑選Status為1或2的資料,並只呈現前十筆\n",
"df.loc[df.Status.isin([1, 2])].head(n=10)"
]
},
{
"cell_type": "markdown",
"metadata": {
"id": "w9Z0mpXHJPCR"
},
"source": [
"\n",
"- ### 對欄位進行排序\n",
"\n",
"在Excel中大家最常用到的功能之一就是排序了,在pandas中我們也可以輕易地做到這件事情。"
]
},
{
"cell_type": "code",
"execution_count": null,
"metadata": {
"id": "0mGGQN5dJPCR"
},
"outputs": [],
"source": [
"df.sort_values(by='CustomerCount').head(10)"
]
},
{
"cell_type": "code",
"execution_count": null,
"metadata": {
"id": "I4KPt2osJPCR"
},
"outputs": [],
"source": [
"df.sort_values('Status', ascending=False)"
]
},
{
"cell_type": "code",
"execution_count": null,
"metadata": {
"id": "OcqjmNkCJPCS"
},
"outputs": [],
"source": [
"df.sort_values(by=['State', 'CustomerCount']).head(10)"
]
},
{
"cell_type": "code",
"execution_count": null,
"metadata": {
"id": "3Pdax-yJJPCS"
},
"outputs": [],
"source": [
"# 以CustomerCount欄位的數值做排序,並呈現前10筆資料。預設會由小到大做排序\n",
"df.sort_values(by='CustomerCount').head(10)\n",
"\n",
"# 依照Status欄位並且以降冪方式排序\n",
"df.sort_values('Status', ascending=False)\n",
"\n",
"# 依照State與CustomerCount排序,並呈現前10筆資料\n",
"df.sort_values(by=['State', 'CustomerCount']).head(10)"
]
},
{
"cell_type": "markdown",
"metadata": {
"id": "sCUsENvGJPCS"
},
"source": [
"\n",
"- ### 增加與刪除欄位\n",
"\n",
"我們可以使用下面的方法在一個dataframe中增加或減少欄位。"
]
},
{
"cell_type": "code",
"execution_count": null,
"metadata": {
"id": "wy5576BAJPCT"
},
"outputs": [],
"source": [
"df = pd.DataFrame(data={'name': ['Abby', 'Bob', 'Chris']})\n",
"df"
]
},
{
"cell_type": "code",
"execution_count": null,
"metadata": {
"id": "ryt6-JFyJPCT"
},
"outputs": [],
"source": [
"# 建立一個dataframe,裡面只有name這個欄位\n",
"df = pd.DataFrame(data={'name': ['Abby', 'Bob', 'Chris']})\n",
"\n",
"# 多建一個Age欄位並填入資料\n",
"df['Age'] = [20, 15, 28]\n",
"\n",
"# 在建立一個欄位greater_than_18判斷是否年齡大於18歲\n",
"df['greater_than_18'] = df['Age'] > 18\n",
"\n",
"# 將df印出看看結果是甚麼\n",
"df"
]
},
{
"cell_type": "code",
"execution_count": null,
"metadata": {
"id": "veKx6JB2JPCU"
},
"outputs": [],
"source": [
"df.drop(columns='greater_than_18')"
]
},
{
"cell_type": "code",
"execution_count": null,
"metadata": {
"id": "f9FHhrN5JPCU"
},
"outputs": [],
"source": [
"print(df.columns)"
]
},
{
"cell_type": "code",
"execution_count": null,
"metadata": {
"id": "uRzkDuy-JPCU"
},
"outputs": [],
"source": [
"# 刪除df中的greater_than_18欄位,將會回傳刪掉此欄位的dataframe出來\n",
"df.drop(columns='greater_than_18')\n",
"\n",
"# 若沒有把上面的結果存下來,df這個dataframe仍然會有兩個欄位\n",
"print(df.columns)\n",
"\n",
"# 如果我們想要在刪除欄位後不回傳任何東西,而是直接將結果存入原本的變數中,可以使用inplace這個參數\n",
"df.drop(columns='greater_than_18', inplace=True)\n",
"\n",
"# 看看設定inplace=True後資料是不是就少了這個欄位了\n",
"print(df.columns)"
]
},
{
"cell_type": "markdown",
"metadata": {
"id": "Yi8ejolwJPCU"
},
"source": [
"\n",
"- ### 合併多個dataframe\n",
"\n",
"如同在numpy上所遇到的事情,有時我們會需要以各種方式合併兩個或多個表格資料,針對這樣的需求Pandas提也供了各式各樣的函數,但以下我們只先針對concat與merge兩種不同的合併方式做說明。若大家對此部分的功能有興趣的話可以參考[Pandas官方文件](https://pandas.pydata.org/pandas-docs/stable/user_guide/merging.html)"
]
},
{
"cell_type": "markdown",
"metadata": {
"id": "dh9sDq0PJPCV"
},
"source": [
"- #### concat 功能\n",
"\n",
"pd.concat函數可以把表格資料依照行或列的方式合併起來,且擁有許多參數可供彈性地調整。"
]
},
{
"cell_type": "code",
"execution_count": null,
"metadata": {
"id": "VaSyNmuVJPCV"
},
"outputs": [],
"source": [
"# 產生範例資料,其中df1與df2的欄位名稱皆相同\n",
"\n",
"df1 = pd.DataFrame({'A': ['A0', 'A1', 'A2', 'A3'],\n",
" 'B': ['B0', 'B1', 'B2', 'B3'],\n",
" 'C': ['C0', 'C1', 'C2', 'C3'],\n",
" 'D': ['D0', 'D1', 'D2', 'D3']}, index=[0, 1, 2, 3])\n",
"\n",
"\n",
"df2 = pd.DataFrame({'A': ['A4', 'A5', 'A6', 'A7'],\n",
" 'B': ['B4', 'B5', 'B6', 'B7'],\n",
" 'C': ['C4', 'C5', 'C6', 'C7'],\n",
" 'D': ['D4', 'D5', 'D6', 'D7']}, index=[4, 5, 6, 7])"
]
},
{
"cell_type": "code",
"execution_count": null,
"metadata": {
"id": "iUAVYmXrJPCV"
},
"outputs": [],
"source": [
"# 觀察df1資料\n",
"df1"
]
},
{
"cell_type": "code",
"execution_count": null,
"metadata": {
"id": "71LmsnitJPCV"
},
"outputs": [],
"source": [
"# 觀察df2資料\n",
"df2"
]
},
{
"cell_type": "code",
"execution_count": null,
"metadata": {
"id": "vnN6s2iJJPCW"
},
"outputs": [],
"source": [
"# 沿著列的方向將兩份資料合併,相同名稱的欄位將會被視為同一個欄位\n",
"result = pd.concat([df1, df2])\n",
"result"
]
},
{
"cell_type": "code",
"execution_count": null,
"metadata": {
"id": "RaqsWmNMJPCW"
},
"outputs": [],
"source": [
"# 沿著列的方向將兩份資料合併,並且以keys函數新增index索引\n",
"result = pd.concat([df1, df2], keys=['dataframe1', 'dataframe2'])\n",
"result"
]
},
{
"cell_type": "code",
"execution_count": null,
"metadata": {
"id": "eBUG5AMFJPCW"
},
"outputs": [],
"source": [
"# 沿著欄的方向將兩份資料合併,相同的index相會被視為同一筆資料\n",
"# 在此由於df1與df2的index數值皆不相同,因此合併後的資料會有八筆\n",
"result = pd.concat([df1, df2], axis=1)\n",
"result"
]
},
{
"cell_type": "markdown",
"metadata": {
"id": "AFGRuQ3TJPCW"
},
"source": [
"#### merge功能\n",
"\n",
"merge不同於concat,將會對應兩資料表中指定欄位的數值將資料作合併。例如我們分別有兩份資料表紀錄產品的價格、以及產品的製造地,我們就可以依照產品名稱這個欄位將兩份資料表合併再一起,也就可以得到製造地與價格之間的對應。此種用法與資料庫語言(SQL)的JOIN方法相同。"
]
},
{
"cell_type": "code",
"execution_count": null,
"metadata": {
"id": "Eq6PhJ8dJPCX"
},
"outputs": [],
"source": [
"# 建立要合併的兩份資料,兩份資料在Key欄位內的數值相同,但其他欄位不同\n",
"\n",
"left = pd.DataFrame({'key': ['K0', 'K1', 'K2', 'K3'],\n",
" 'A': ['A0', 'A1', 'A2', 'A3'],\n",
" 'B': ['B0', 'B1', 'B2', 'B3']})\n",
"\n",
"right = pd.DataFrame({'key': ['K0', 'K1', 'K2', 'K3'],\n",
" 'C': ['C0', 'C1', 'C2', 'C3'],\n",
" 'D': ['D0', 'D1', 'D2', 'D3']})"
]
},
{
"cell_type": "code",
"execution_count": null,
"metadata": {
"id": "V4q-LqKQo5Yo"
},
"outputs": [],
"source": [
"left"
]
},
{
"cell_type": "code",
"execution_count": null,
"metadata": {
"id": "vpiQCwQEo5Yp"
},
"outputs": [],
"source": [
"right"
]
},
{
"cell_type": "code",
"execution_count": null,
"metadata": {
"id": "pON_k7H7JPCX"
},
"outputs": [],
"source": [
"# 使用pd.merge將left與right依照key欄位的數值合併起來\n",
"result = pd.merge(left, right, on='key')\n",
"result"
]
},
{
"cell_type": "markdown",
"metadata": {
"id": "Bnrk88o2JPCX"
},
"source": [
""
]
},
{
"cell_type": "markdown",
"metadata": {
"id": "s9u4K4HzJPCX"
},
"source": [
"在上面的例子中,兩份dataframe在key欄位的數值皆相同,因此在合併上並不會有特別的問題,然而有時兩份dataframe在要合併的欄位上不會完全相同,此時資料表中不重複的部分有哪些處理方式呢?在這邊我們就來介紹幾種可能的合併方法,在pd.merge函數內可以使用how參數決定使用何種合併方法。\n",
"\n",
" "
]
},
{
"cell_type": "code",
"execution_count": null,
"metadata": {
"id": "jDOAdxmOJPCY"
},
"outputs": [],
"source": [
"# 建立兩個datafrmae,後續會依照key1與key2將其合併\n",
"\n",
"left = pd.DataFrame({'key1': ['K0', 'K0', 'K1', 'K2'],\n",
" 'key2': ['K0', 'K1', 'K0', 'K1'],\n",
" 'A': ['A0', 'A1', 'A2', 'A3'],\n",
" 'B': ['B0', 'B1', 'B2', 'B3']})\n",
"\n",
"right = pd.DataFrame({'key1': ['K0', 'K1', 'K1', 'K2'],\n",
" 'key2': ['K0', 'K0', 'K0', 'K0'],\n",
" 'C': ['C0', 'C1', 'C2', 'C3'],\n",
" 'D': ['D0', 'D1', 'D2', 'D3']})"
]
},
{
"cell_type": "code",
"execution_count": null,
"metadata": {
"id": "XRoJwBYVo5Yp"
},
"outputs": [],
"source": [
"left"
]
},
{
"cell_type": "code",
"execution_count": null,
"metadata": {
"id": "ZgfaR7bco5Yq"
},
"outputs": [],
"source": [
"right"
]
},
{
"cell_type": "code",
"execution_count": null,
"metadata": {
"id": "K1iO1BRuJPCY"
},
"outputs": [],
"source": [
"# left join\n",
"# 只有左邊的dataframe擁有的欄位數值組合會保留下來\n",
"\n",
"result = pd.merge(left, right, on=['key1', 'key2'], how='left')\n",
"result"
]
},
{
"cell_type": "markdown",
"metadata": {
"id": "mbfFjr9dJPCY"
},
"source": [
""
]
},
{
"cell_type": "code",
"execution_count": null,
"metadata": {
"id": "3iBh761oJPCY"
},
"outputs": [],
"source": [
"# right join\n",
"# 只有右邊dataframe中出現的欄位數值組合會保留下來\n",
"\n",
"result = pd.merge(left, right, how='right', on=['key1', 'key2'])\n",
"result"
]
},
{
"cell_type": "markdown",
"metadata": {
"id": "NEUfIwWtJPCZ"
},
"source": [
""
]
},
{
"cell_type": "code",
"execution_count": null,
"metadata": {
"id": "8skZHkadJPCZ"
},
"outputs": [],
"source": [
"# inner join\n",
"# 只有兩個dataframe中共有的欄位數值組合會被保留下來\n",
"\n",
"result = pd.merge(left, right, how='inner', on=['key1', 'key2'])\n",
"result"
]
},
{
"cell_type": "markdown",
"metadata": {
"id": "3WET_03JJPCZ"
},
"source": [
""
]
},
{
"cell_type": "code",
"execution_count": null,
"metadata": {
"id": "58arsciLJPCZ"
},
"outputs": [],
"source": [
"# outer join\n",
"# 無論出現在哪一個dataframe的欄位數值組合都會被保留下來\n",
"\n",
"result = pd.merge(left, right, how='outer', on=['key1', 'key2'])\n",
"result"
]
},
{
"cell_type": "markdown",
"metadata": {
"id": "Rl4Apfz8JPCa"
},
"source": [
""
]
},
{
"cell_type": "markdown",
"metadata": {
"id": "Ywlz1hSEJPCa"
},
"source": [
"### 請參考 [100-pandas-puzzles](https://github.com/ajcr/100-pandas-puzzles/blob/master/100-pandas-puzzles.ipynb) 做更多 pandas 的資料操作練習"
]
}
],
"metadata": {
"colab": {
"name": "Pandas_part1.ipynb",
"provenance": []
},
"kernelspec": {
"display_name": "Python 3 (ipykernel)",
"language": "python",
"name": "python3"
},
"language_info": {
"codemirror_mode": {
"name": "ipython",
"version": 3
},
"file_extension": ".py",
"mimetype": "text/x-python",
"name": "python",
"nbconvert_exporter": "python",
"pygments_lexer": "ipython3",
"version": "3.7.10"
}
},
"nbformat": 4,
"nbformat_minor": 0
}
"
]
},
{
"cell_type": "code",
"execution_count": null,
"metadata": {
"id": "jDOAdxmOJPCY"
},
"outputs": [],
"source": [
"# 建立兩個datafrmae,後續會依照key1與key2將其合併\n",
"\n",
"left = pd.DataFrame({'key1': ['K0', 'K0', 'K1', 'K2'],\n",
" 'key2': ['K0', 'K1', 'K0', 'K1'],\n",
" 'A': ['A0', 'A1', 'A2', 'A3'],\n",
" 'B': ['B0', 'B1', 'B2', 'B3']})\n",
"\n",
"right = pd.DataFrame({'key1': ['K0', 'K1', 'K1', 'K2'],\n",
" 'key2': ['K0', 'K0', 'K0', 'K0'],\n",
" 'C': ['C0', 'C1', 'C2', 'C3'],\n",
" 'D': ['D0', 'D1', 'D2', 'D3']})"
]
},
{
"cell_type": "code",
"execution_count": null,
"metadata": {
"id": "XRoJwBYVo5Yp"
},
"outputs": [],
"source": [
"left"
]
},
{
"cell_type": "code",
"execution_count": null,
"metadata": {
"id": "ZgfaR7bco5Yq"
},
"outputs": [],
"source": [
"right"
]
},
{
"cell_type": "code",
"execution_count": null,
"metadata": {
"id": "K1iO1BRuJPCY"
},
"outputs": [],
"source": [
"# left join\n",
"# 只有左邊的dataframe擁有的欄位數值組合會保留下來\n",
"\n",
"result = pd.merge(left, right, on=['key1', 'key2'], how='left')\n",
"result"
]
},
{
"cell_type": "markdown",
"metadata": {
"id": "mbfFjr9dJPCY"
},
"source": [
""
]
},
{
"cell_type": "code",
"execution_count": null,
"metadata": {
"id": "3iBh761oJPCY"
},
"outputs": [],
"source": [
"# right join\n",
"# 只有右邊dataframe中出現的欄位數值組合會保留下來\n",
"\n",
"result = pd.merge(left, right, how='right', on=['key1', 'key2'])\n",
"result"
]
},
{
"cell_type": "markdown",
"metadata": {
"id": "NEUfIwWtJPCZ"
},
"source": [
""
]
},
{
"cell_type": "code",
"execution_count": null,
"metadata": {
"id": "8skZHkadJPCZ"
},
"outputs": [],
"source": [
"# inner join\n",
"# 只有兩個dataframe中共有的欄位數值組合會被保留下來\n",
"\n",
"result = pd.merge(left, right, how='inner', on=['key1', 'key2'])\n",
"result"
]
},
{
"cell_type": "markdown",
"metadata": {
"id": "3WET_03JJPCZ"
},
"source": [
""
]
},
{
"cell_type": "code",
"execution_count": null,
"metadata": {
"id": "58arsciLJPCZ"
},
"outputs": [],
"source": [
"# outer join\n",
"# 無論出現在哪一個dataframe的欄位數值組合都會被保留下來\n",
"\n",
"result = pd.merge(left, right, how='outer', on=['key1', 'key2'])\n",
"result"
]
},
{
"cell_type": "markdown",
"metadata": {
"id": "Rl4Apfz8JPCa"
},
"source": [
""
]
},
{
"cell_type": "markdown",
"metadata": {
"id": "Ywlz1hSEJPCa"
},
"source": [
"### 請參考 [100-pandas-puzzles](https://github.com/ajcr/100-pandas-puzzles/blob/master/100-pandas-puzzles.ipynb) 做更多 pandas 的資料操作練習"
]
}
],
"metadata": {
"colab": {
"name": "Pandas_part1.ipynb",
"provenance": []
},
"kernelspec": {
"display_name": "Python 3 (ipykernel)",
"language": "python",
"name": "python3"
},
"language_info": {
"codemirror_mode": {
"name": "ipython",
"version": 3
},
"file_extension": ".py",
"mimetype": "text/x-python",
"name": "python",
"nbconvert_exporter": "python",
"pygments_lexer": "ipython3",
"version": "3.7.10"
}
},
"nbformat": 4,
"nbformat_minor": 0
}